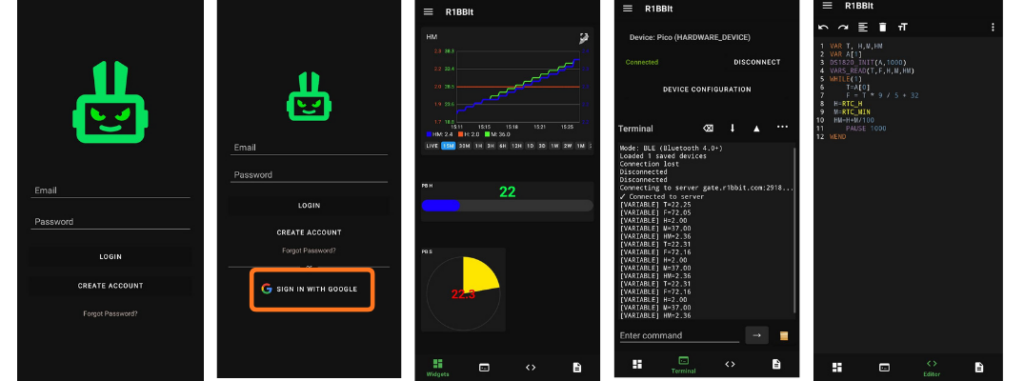
Download the R1BBIT app from Google Play and either register with your email or sign in using your Google account. During registration, enter your first name, last name, email, and password, then complete the Sign Up process by verifying your email.
Once logged in, you can add multiple devices based on your subscription plan and unlock the full functionality of the native Android app.
Below, we explain in detail how everything works.
Main Menu
- Add Device – add a new device to your account.
- Theme – change the application appearance (light or dark mode).
- Language – select the interface language.
- Connection – view and manage connection settings.
- Logout – sign out of your account.

Tap “Add Device” and set a custom device name and serial number. Next, choose a connection method. Four connection types are available.
Bluetooth – requires an HM10 or HM11 BT module. The module must be connected to the R1BBIT board via the UART port.
Connect the Bluetooth adapter to the UART port:
VCC → 3.3V
GND → GND
TX → RX
RX → TX
Wi-Fi Direct and Server connections are described here.
USB – connect your smartphone directly to the R1BBIT board using a USB Type-C cable. The smartphone will power the board and allow you to upload scripts, start and stop execution, update firmware, and receive script execution data in the terminal.
Code Editor
After establishing the connection, you can write a script. The code editor highlights syntax in color and marks errors in red.
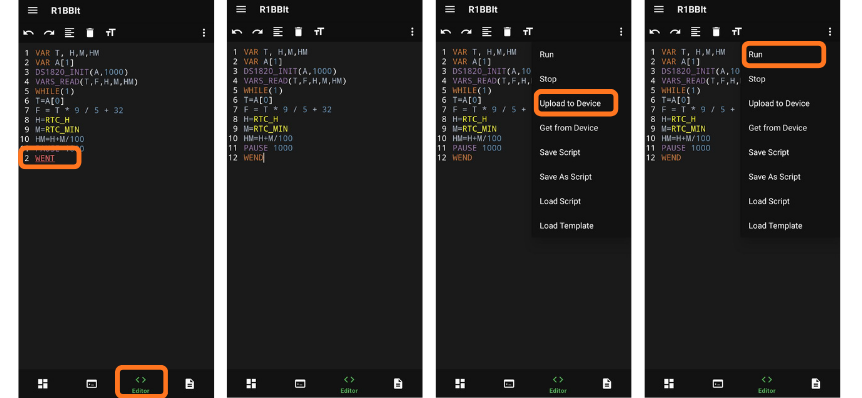
You can also save scripts, load previously saved ones, and download ready-made examples. The editor includes convenient features such as undo and redo, clear screen, code formatting, and font size adjustment.
Terminal
The terminal window allows you to monitor program execution in real time and see which variable values are being sent to the server. Using the PRINT “VAR=” … function, you can output specific variables to verify correct program behavior.
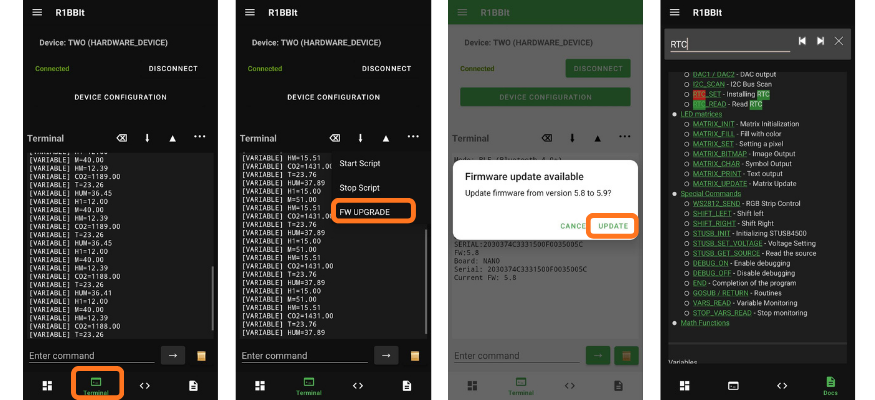
The terminal also includes a small menu to start and stop script execution, as well as a device firmware update function.
In addition, you can enter direct commands in the terminal to control the device, such as setting the time or executing service commands. A built-in help system provides full documentation for all commands directly in the app, with search and easy navigation.
Widgets
Widget actions:
- Delete
- Edit – widgets have different display parameters for user convenience
- Add new widget
- Save changes
- Change widget size and position on the screen
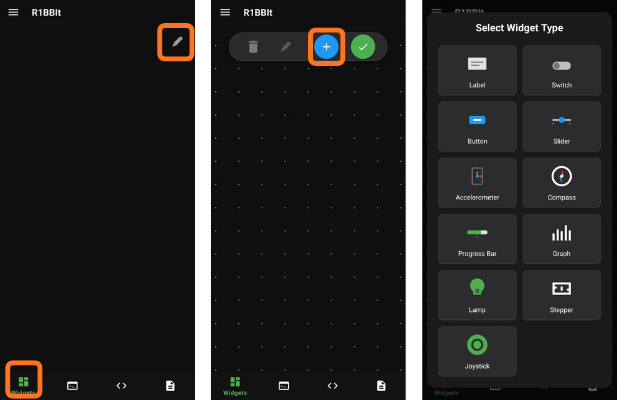
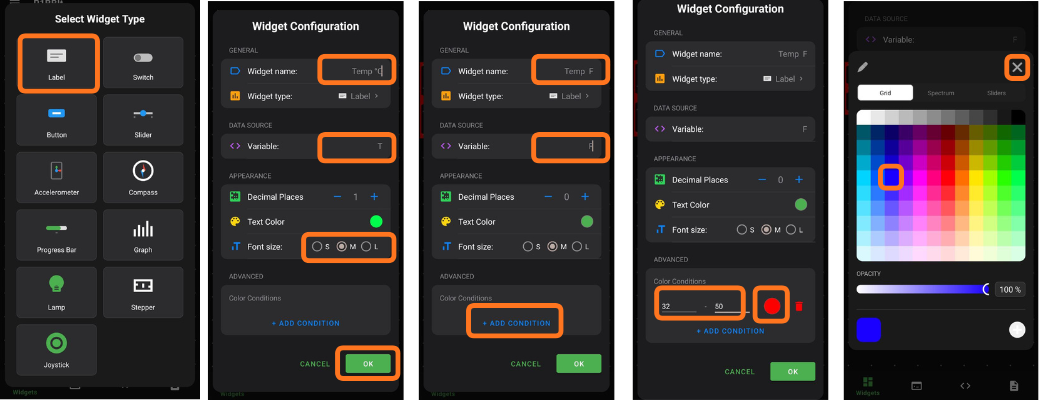
Label
The Label widget displays the value of one variable.
Parameters:
- Widget name: Displayed as the widget title on the widgets screen
- Variable: Select which variable to display
- Decimal Places: Number of digits after the decimal point
- Text Color: Default color used to display the variable value
- Font size: S, M, L
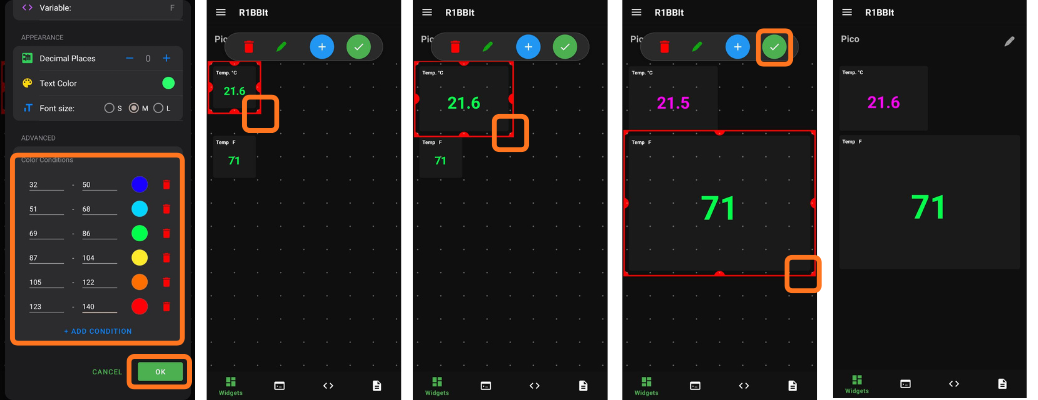
ADVANCED
Add Condition:
You can define multiple value ranges for the variable and assign a different display color for each range.
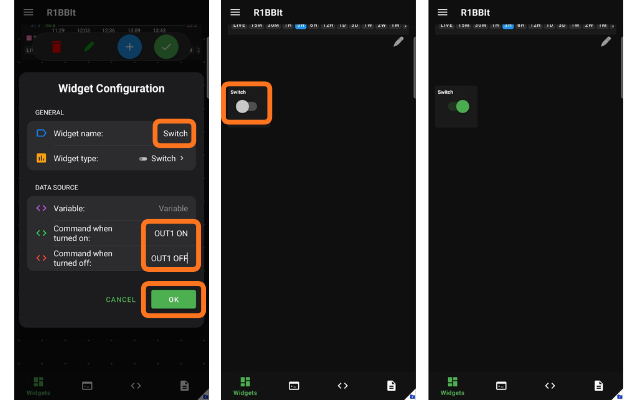
Switch
The Switch widget allows you to trigger one action when it is turned on and another action when it is turned off. The switch remains in its current state until the user manually changes it, making it ideal for persistent on/off control.
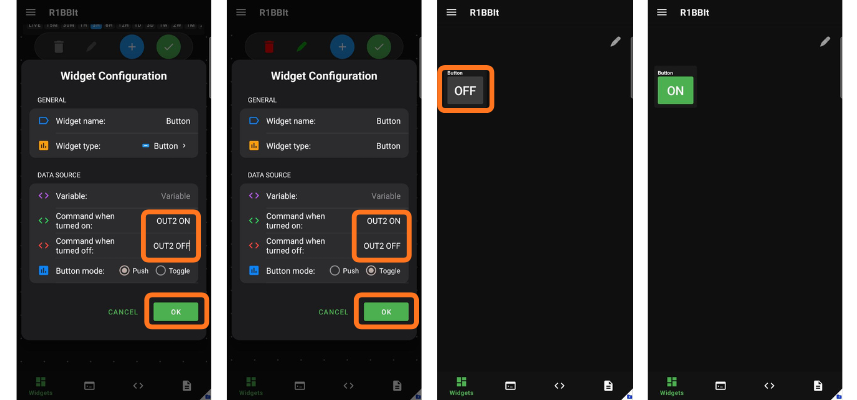
Button
Unlike the Switch widget, the Button offers additional operating modes: Toggle and Push.
- Toggle mode works the same way as the Switch: one action is executed when the button is turned on, and another when it is turned off. The state remains active until the user changes it.
- Push mode keeps the button active only while it is being pressed. Once the user releases the button, the off command is automatically triggered.
This makes the Button suitable for both persistent actions and momentary controls.
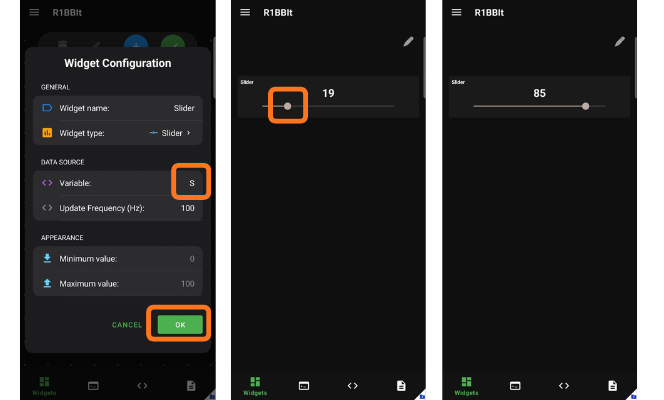
Slider
The Slider widget allows the user to set a value that is sent to the script via a specified variable for further processing.
It provides a simple and intuitive way to control numeric values in real time directly from the interface.
Accelerometer
Sends the smartphone accelerometer data to the specified variables. This data can be used in your script logic.
- Variable X, Variable Y, Variable Z: Specify which variables receive the accelerometer values for the X, Y, and Z axes
- Update Frequency: Defines how many times per second the data is sent
Compass
Sends the smartphone compass value to the specified variable. This data can be used in your script logic.
- Variable: Specifies which variable receives the compass value
- Update Frequency: Defines how many times per second the data is sent
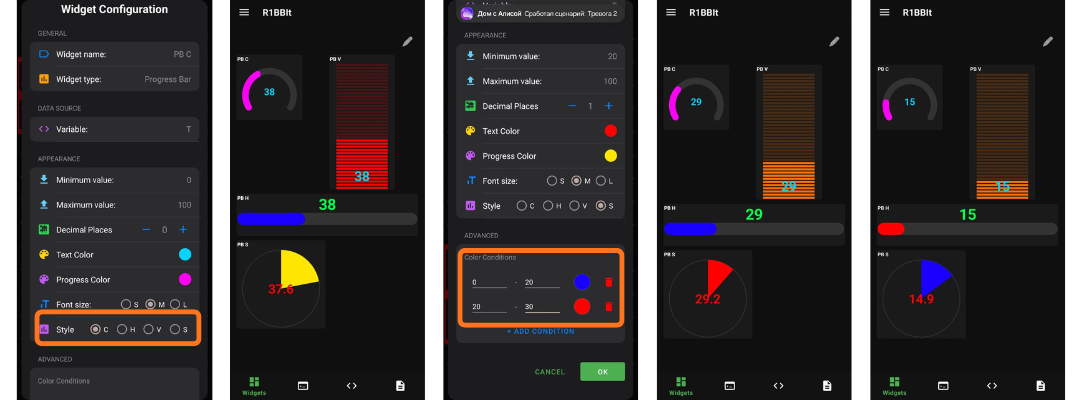
Proress Bar
Allows you to visually display the value of a user variable.
There are four widget types available:
- C – Circle
- H – Horizontal
- V – Vertical
- S – Sector
You can also enable color changes based on different value ranges of the variable.
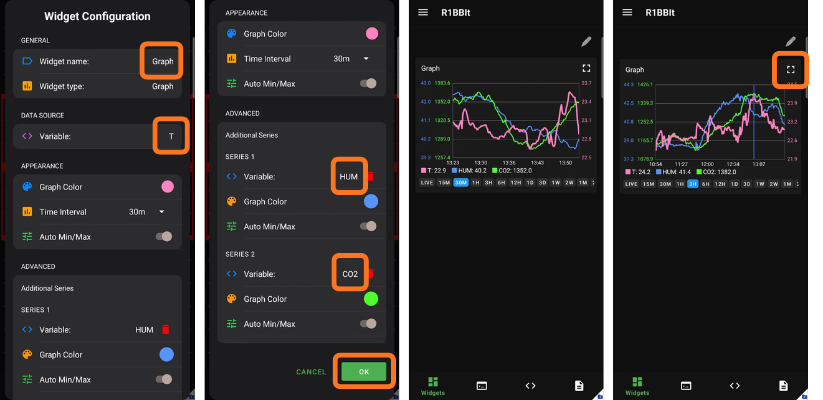
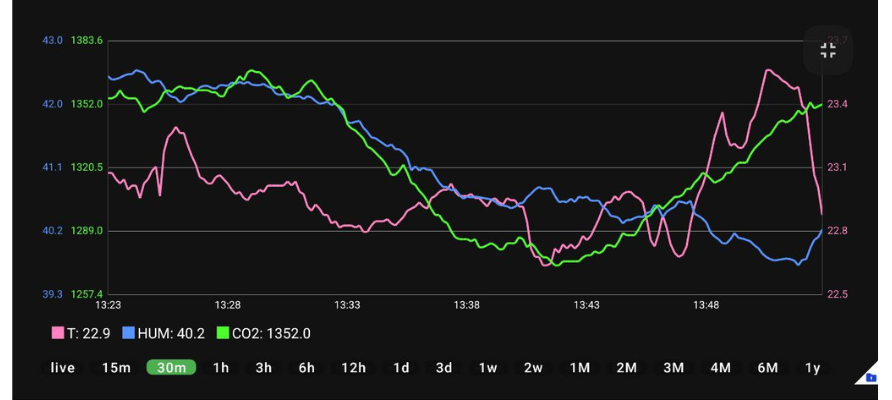
Graph
The Graph widget is the most advanced and powerful widget available. It allows you to display one or multiple variables on a single graph, with individual colors assigned to each data series. Each variable is shown using its own scale, making the graphs clear, readable, and easy to interpret.
By tapping and holding on the graph, a cursor appears, allowing you to precisely inspect values for all variables at a specific point in time.
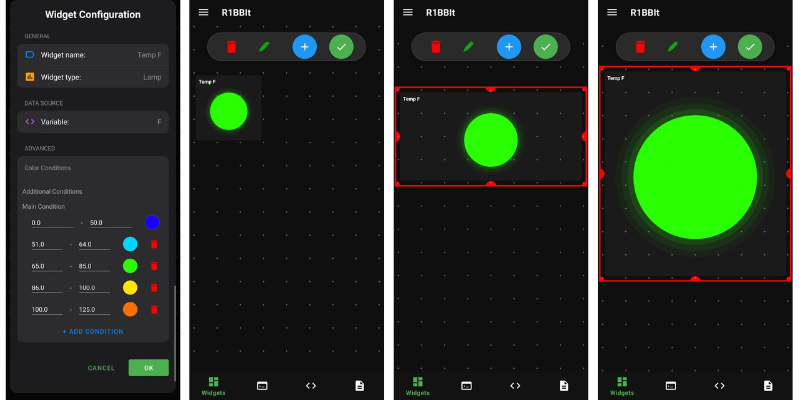
Lamp
Lamp – Displays a color indicator of adjustable size, where the color depends on the user variable range.
If the value is outside the defined range, the indicator color will be dark gray.
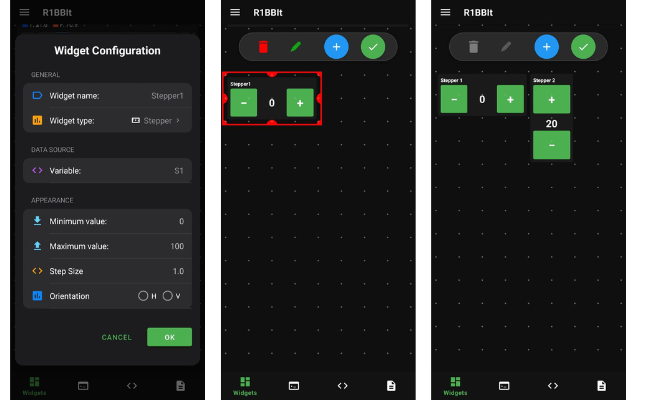
Stepper
The Stepper widget lets users input a numeric value and send it to the program through a selected variable. You can define a custom minimum and maximum range, as well as the step size for increasing or decreasing the value. Pressing and holding the + or − buttons will rapidly adjust the value within the specified range, making precise and fast control easy.
The Stepper can be displayed in horizontal or vertical orientation.
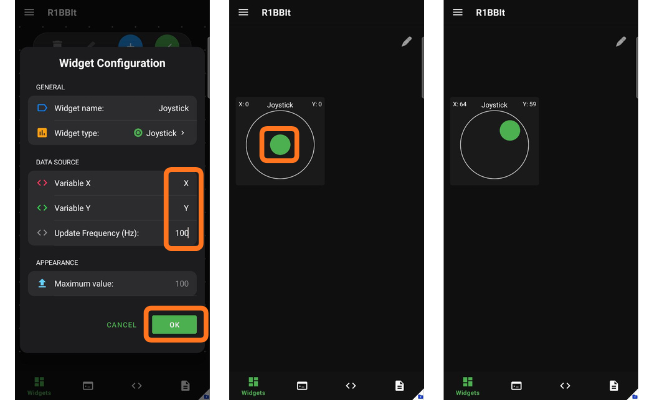
Joystick
The Joystick widget allows the user to control and send X and Y coordinate values to the script via specified variables, providing smooth and responsive operation.
When the user releases the joystick, both values automatically return to 0, 0, making it ideal for directional and motion control.