
Cowboy with a knife: the five-finger fillet, played by a stepper and a servo
A cowboy sits on a barrel at a table. You put your hand flat on the engraved outline, the torso turns on a stepper to the gap you want between two fingers, and the right arm on an SG90 brings the knife down. The legs and the pelvis never move. The motor stands inside the barrel under its lid, with room beneath it for an ESP32 and a driver.
234 mm to the top of the hat. The table is 160 × 220 mm with the top at 120 mm. cowboy_assembled.3mf is the whole scene as it goes together — it is a 17 MB file, so it takes a moment to open.
Parts. Anything made of several colours is split into separate STLs. In Bambu Studio select all the files of one part, import them, answer yes to "load as a single object with multiple parts" and assign the filaments. Everything is already oriented for printing.
| Part | Colours | Size, mm | Supports |
|---|---|---|---|
01_barrel_base |
light wood, dark metal hoops | 168 × 166 × 82 | no: the barrel's ceiling is a 45° cone |
02_table (print it upside down) |
wood | 160 × 220 × 120 | only under the tenons on the legs |
03_legs_pelvis |
blue jeans, brown boots | 76 × 125 × 96 | yes, tree supports from the plate |
04_hub |
any | 14 × 14 × 37 | no |
05_torso_front, 06_torso_back (they lie on the cut plane) |
brown vest, cream shirt, skin | 86 × 85 × 26 | a little on the sleeve |
07_arm (on its flat inner face) |
shirt, skin | 45 × 98 × 18 | under the fist |
08_shoulder_plug |
shirt | 8 × 8 × 16 | no |
09_knife (flat) |
silver blade, brown handle | 75 × 17 × 4 | no |
10_bandana |
red | 31 × 36 × 25 | yes |
11_head |
skin, black for the moustache, brows and eyes | 40 × 44 × 40 | under the chin and the moustache |
12_hat |
brown, black band | 83 × 92 × 32 | under the brim |
PLA, 0.2 mm layers, 15% infill. Give the barrel, the table and the hub 3–4 perimeters.
You also need: a NEMA17 42×42×40 with a 5 mm flatted shaft (if your motor is a different length nothing changes — it hangs from the lid by its flange), an SG90 with the single-arm horn from its kit, 4 × M3 countersunk 8–10 mm for the motor, 2 × M3×12 for the pelvis, 3 × M3×20 for the torso halves, one M3×6 grub screw for the hub, 2 × M3×14 for the table dovetails, a piece of copper tape about 70 × 60 mm with a wire for the palm sensor, an ESP32, an A4988 or TMC2209, 12 V for the motor and 5 V for the servo.
Assembly. The motor goes into the barrel from below and its shaft comes up through the lid, connector facing back towards the cable cutout; four countersunk M3 hold it from the top. Push the hub onto the shaft, grub screw against the flat. Run the servo cable through the hole in the barrel lid before the pelvis goes on, then drop the pelvis with the legs over the hub and tighten the two M3×12 from above.
The SG90 horn drops into the pocket on the inner face of the arm, which copies its shape, and takes two of the kit's self-tapping screws; if the holes do not line up with the dimples, make new ones with an awl. 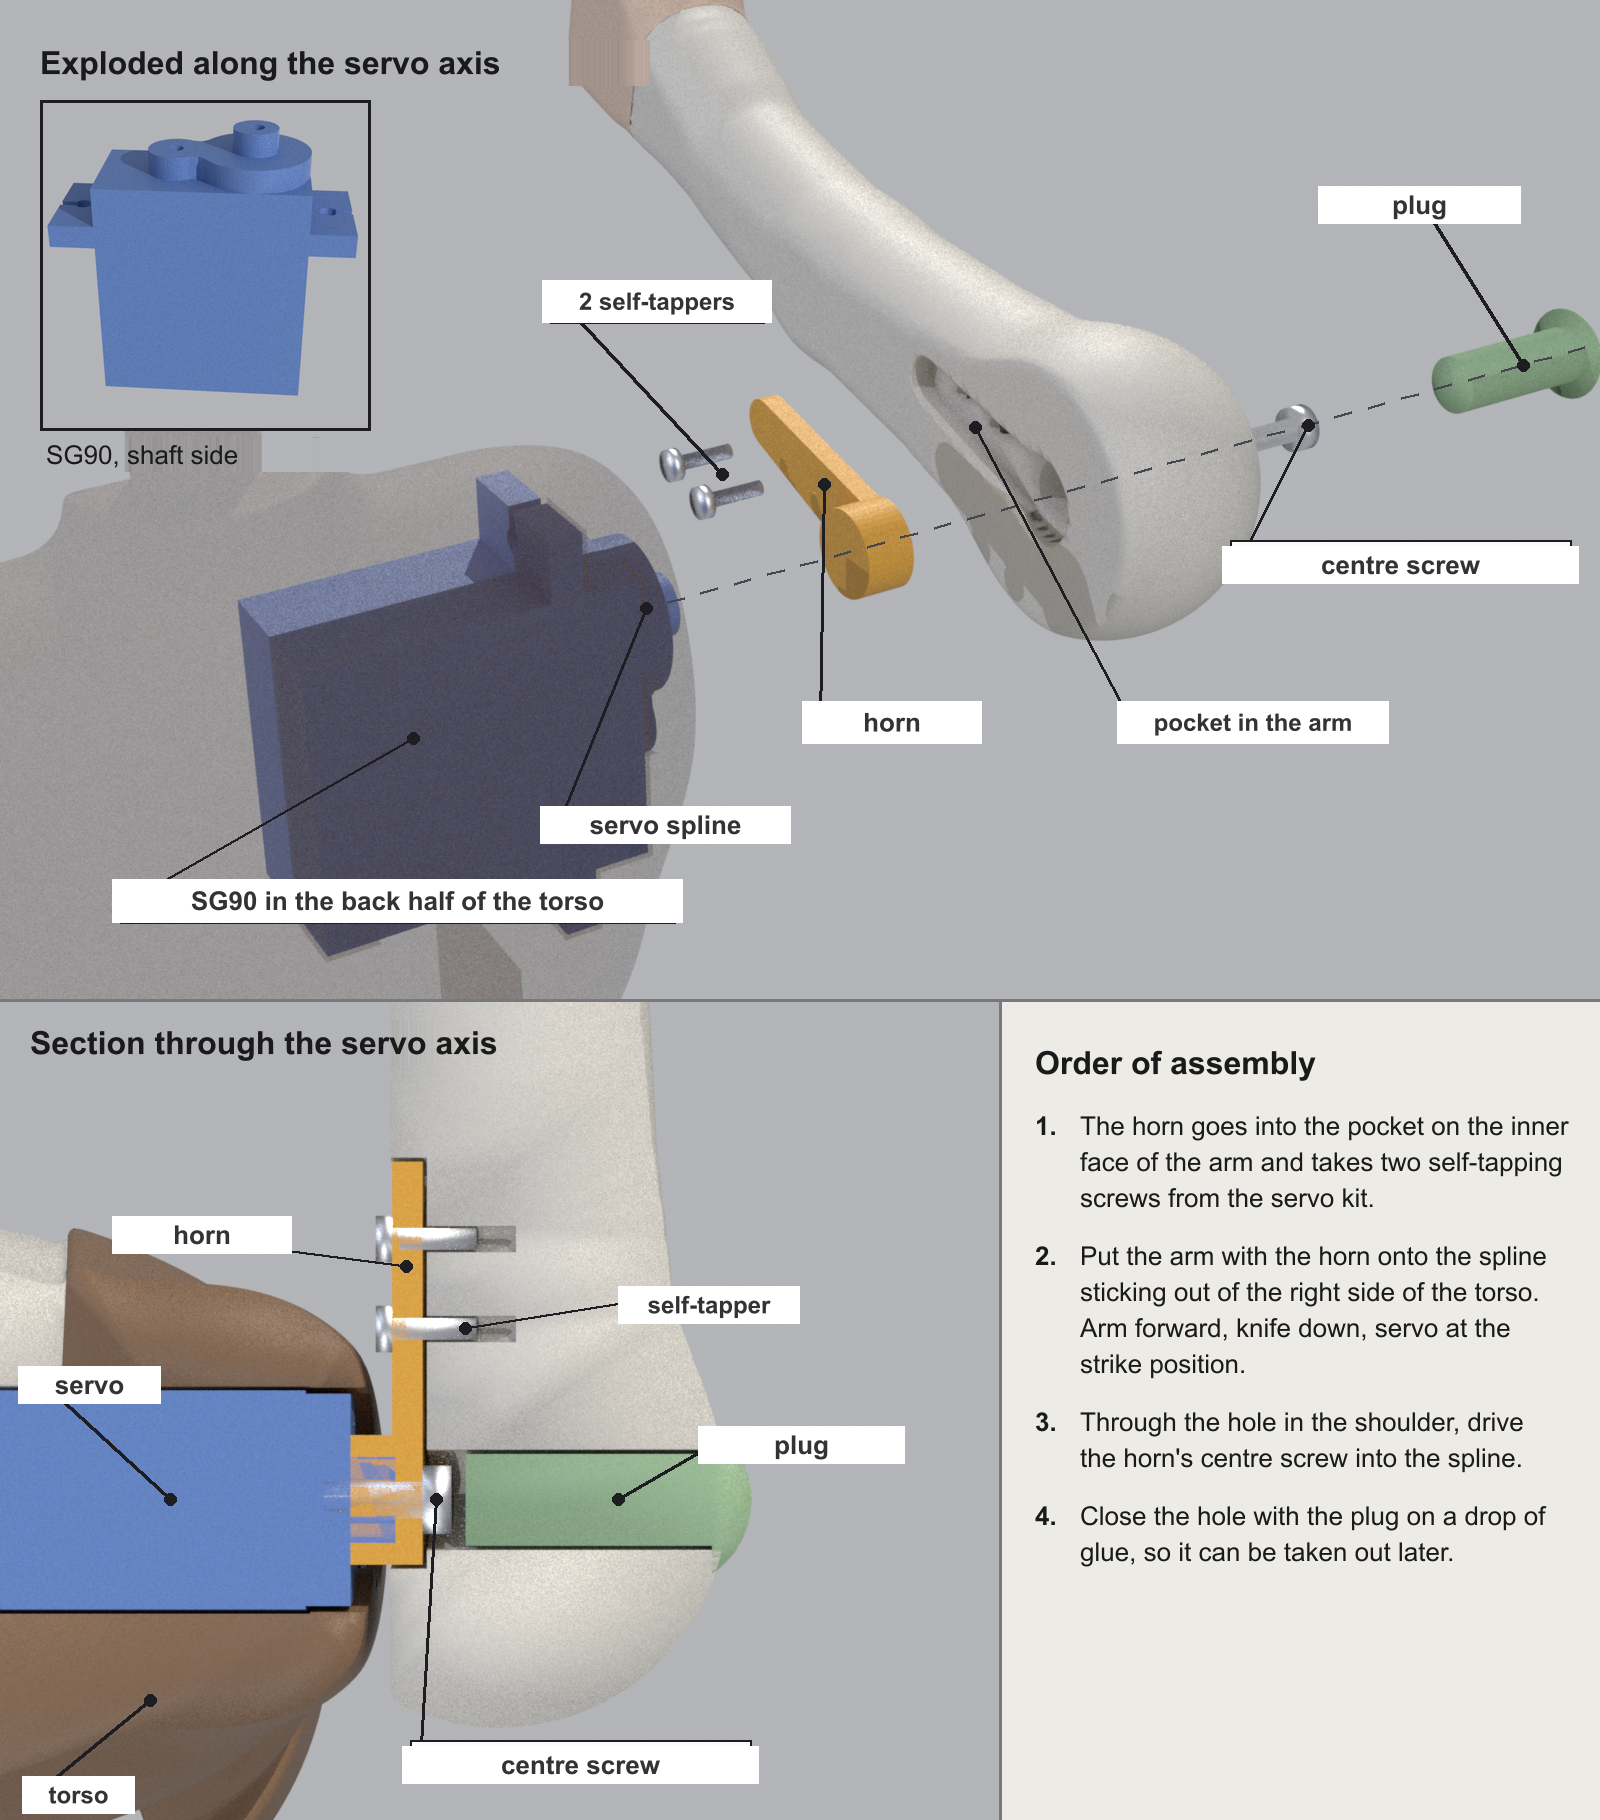
The servo itself lies in the back half of the torso; its cable runs down the channel to the hole in the floor of the torso, then along the curved groove in the top of the pelvis and out of the side towards the barrel. That groove is what lets the cable slide instead of being pulled as the torso turns. Close it with the front half and pull it together with three M3×20 from the back — the hex socket in the floor of the torso lands on the hub.
Bandana over the neck, head onto its pin, hat onto the head, both on glue. Set the servo to the strike position, then put the arm on the spline so it points forward and slightly up, around 14° above horizontal, with the knife down; the horn's centre screw goes in through the hole in the shoulder and the plug closes it on a drop of glue. The knife goes into the fist from below, handle up, as far as the guard. The tenons on the near table legs drop into the slots on the base from above and two M3×14 hold them from underneath. The copper tape goes into the pocket under the table top, its wire along the groove to the near right leg and down into the barrel.
Where the knife lands. Put your left hand on the engraved outline, fingers spread, pointing at the cowboy. The tip travels on a R98 mm circle around the motor axis and crosses the gaps 30–40 mm from the fingertips, nearer the base of the fingers. The strike points are engraved as crosses in circles.
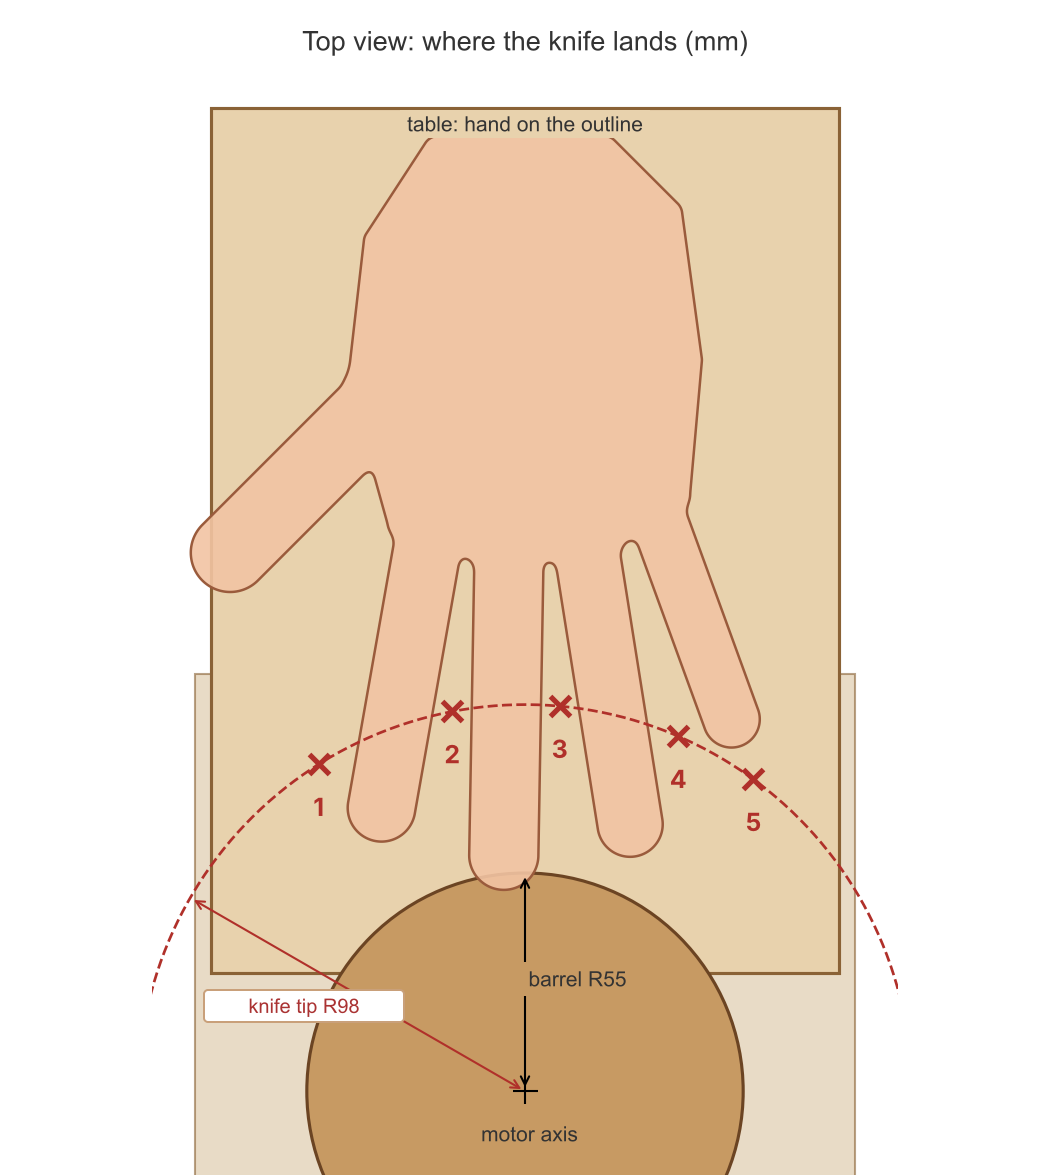
| Point | Where | Torso angle |
|---|---|---|
| 1 | left of the index finger | −56.1° |
| 2 | index to middle | −34.7° |
| 3 | middle to ring | −18.7° |
| 4 | ring to little | −0.5° |
| 5 | right of the little finger | +12.4° |
Plus is to the cowboy's right, and those angles assume the hand sits exactly on the outline. Hands differ, so the firmware is better off with a teach mode: put the hand down, walk the torso with two buttons until a slowly lowered knife stands over the gap, and save the angle for each point.
The arm lifts 25–30° from the strike position, which is enough for the tip to clear the fingers. Do not take it past 50°: the fist hits the brim of the hat.
The knife is plastic and its tip is rounded. Run the first passes slowly.
The STEP sources exist for every part — ask and I will post them.
Files
- For which board
- ESP32 DevKit
- Material
- PLA
- Layer height, mm
- 0.2
- Infill, %
- 15
- Supports
- Yes
- License
- CC-BY-4.0